

Features
- Relatively easy to build
- Emulates a keyboard, so it needs no driver
- Costs around 10 €
- Is easy to configure, in under one minute
- Works with most remote controls
- Can easily be customised for other HTPC software
I was always very fascinated with Objective Development's software implementation of a USB driver for Atmel controllers called V-USB. On their web site, they have a nice list of really interesting projects using this driver.
There are a few projects that translate IR remote control signals into USB HID key strokes. This has one huge advantage: You don't need any driver or software on the PC. I had use for this, since I am using a PC with MythTV to watch TV. The standard means to control it is an IR remote with LIRC.
But with LIRC I had some mixed results . It is quite a universal and versatile tool. This means you need to do a lot of configuring. You have to edit several files and it is not straightforward. And the teaching phase has always been trial and error for me.
With a microcontroller decoding the IR protocol, one part of the bothersome configuration is eliminated. And the second part can be relatively easy, as only a simple IR to key stroke assignment is needed.
The projects listed at Object Developments website jnclude InfraHID, USB IR HID and RC-5Remote. Unfortunately, these project use one or two fixed IR protocols. RC5 for example is outdated and not a good choice for a PVR. And anyway, I wanted to have something more flexible than a device that is capable of only working with one IR code.
Something very close to what I wanted is USBASP Einschalter. It has several highlights. It uses the excellent IRMP library for decoding the IR commands. This library supports tons of different protocols. And the Einschalter runs on a very cheap hardware: A re-purposed USBasp programmer, available from your favourite Chinese online shop for three to four Euros. All you need is a small additional PCB with the IR sensor and an optional optocoupler for activating the PC power button.
Unfortunately, the makers of this project decided not to emulate a HID keyboard, but instead to implement a HID remote. This means that you do need host software. The project actually extended the LIRC demon by a new IRMP option. Not my idea of easy configuration.
The Idea
So I decided to make my own version. When I started the project there were too many unknowns for me. This was the first time that I used V-USB, I had never used the IRMP lib and I didn't know whether the whole code, including a configuration procedure would fit into an ATMega8. Timing/performance was also a concern for me.
This is why I split the problem in two: One controller to receive and decode the IR signals and a second to translate the result into key strokes via USB HID. To send data from one to the other, a simple serial connection would be good enough. And a HW UART would help to reduce the work load.
I didn't want to re-invent the wheel, so I planned to use and modify existing projects. For the first part, the IRMP demo app looked promising. For the second part, I found a couple of projects, which translate serial data to key strokes.
The IR Receiver - Hardware

IRMP works even on ATTiny controllers. Since there is no need for complex peripherals or more than a few I/O pins, an 8-pin variant will do. But in order to support as many IR protocols as possible, you need a lot of program memory. This is the reason for using the ATTiny85 with 8k of flash memory.
The rest of the hardware is rather obvious:
- The IR receiver is a TSOP1738, output directly connected to the controller.
- One controller pin is the serial output.
- Another one controls an LED to give feedback when a valid code is received.

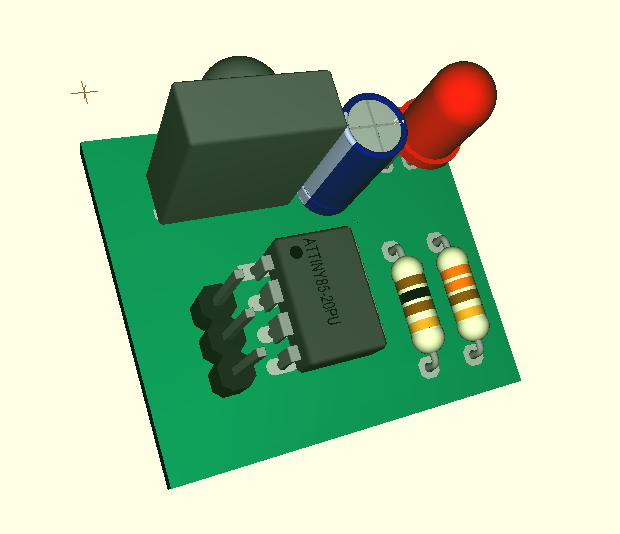
My receiver id built on prototyping board. But this is what a real PCB might look like:
The IRMP lib comes with a demo application which receives IR codes and converts them to a info text containing code ID, device ID, button number and a status flag. This is almost exactly what I wanted. It is a very universal, and therefore a somewhat confusing piece of software. I couldn't get it to run on my ATTiny 85. So I cleaned it out, removed all the code that was of no use for me and replaced it by something more readable. Also, the ATTiny85 has no HW UART; so I added a software UART. For this application, only the transmit function is needed. A 1200 baud rate can easily be generated by the controller.
I left the ASCII message code in the source file as a compile option. But I added code to output a set of six binary bytes for easy processing in normal operation.
Incidentally, the receiver can be used as a tool in its own right e.g. to identify IR remote codes. Connect the serial output to a serial-to-USB converter and you are all set.
The USB Interface - Hardware
This is the easy part. All you need is a USBasp ISP programmer, as available from your favourite Chinese electronics dealer. They are available from around 3 €. Be aware that not all of these parts follow the original design by Th. Fischl completely. Some do not implement the serial interface via the ISP connector and the RX pin is actually the only signal input for the interface.
Of course you need a cable between the IR receiver and the USBasp. The converter supplies 5 V on pin 2, if jumpered correctly. The serial signal from the receiver connects to pin 6 of the ISP connector. And GND is available on pin 10.

The USB Interface - Software
I have to say that I went through quite a learning curve with the software. Naively I had thought that I could build on one of the existing serial to USB HID converter projects as featured on Object Development's website. But somehow I couldn't get any of those to compile and work on the ATMega8 of the USBasp programmer.
Eventually, I decided to start with Joonas Pihlajamaa's excellent tutorial and its related demo implementation of a HID keyboard. And then I gradually extended that one step after the other. I included Peter Fleury's great UART library, added functions to receive, decode serial packets and wrote routines to translate them into key strokes.
Of course you need a comfortable way to configure the Inverter, so I added a function, which prompts you for IR buttons for every key that is useful to have available in MythTV. The prompts are generated as key strokes which can be made visible simply by activating an editor window.
The set-up menu gets activated if you set the Scroll Lock function three times in a row. Pressing the Caps Lock key resets the key press counter. For a HTPC this should not lead to unwanted invocation of the menu, because usually keyboards are not used heavily there. And if they are, no-one uses the Scroll Lock function anyway.
If you want to use this project with an application other than mythtv, just modify the keymaps,h file.
For details on how to program the USBasp stick see my review.
Usage
The receiver is easy to configure. As mentioned before, you have to activate the "Scroll Lock" function three times, i.e. press the corresponding key six times to invoke the set-up menu. The way this set-up works is that the keyboard emulation is used to type out all prompts. So in order to make them visible, just start a text editor window. This needn't be done on the HTPC, but can just as well be done using any other PC.
Hint: If you plan to use a universal remote control, select any device where your remote control actually sends a code for every button that it has. Bear in mind that TVs e.g. have normally no play/pause/ffwd function, whereas VCRs might not have the red/yellow/green/blue buttons. What might work are sat receivers / cable receivers / TVs with PVR function.
You will be asked to press a button on your IR remote control in order to assign it to a keyboard key. The key that will be send by the keyboard emulation is fixed. It is defined in keymaps.h and to change it, you have to recompile the code. I use this for MythTV, so it will work there without recompiling. But bear in mind that the MythTV computer must be set to the default keyboard layout (US, qwerty), because the key strokes that are sent, actually are not ASCII codes but "keyboard locations". So, if you have e.g. set the PC to a qwertz layout, a y that is sent will be interpreted as a z by the PC. Again, if this is an issue, change this in the keymaps.h file and recompile.
Here is what the configuration dialogue looks like:
You can not assign one remote key to more than one key stroke. Trying this would lead to an error message. If there are functions / key strokes that you don't want to assign, press the OK button (or whatever button you assigned first) on your remote to skip that prompt.RemoteKeys by Thomas Frey
Welcome to the setup procedure.
Assign buttons by pressing the appropriate remote key.
Press OK to skip a key assignment.
OK button OK
Right arrow OK
Left arrow OK
(...)
0 OKSetup complete.
Essentially, all you have to do is to press every relevant button on your remote control once. This can be done in under one minute. Much faster than configuring LIRC!
Future Add-Ons and Modifications
One thing that my hardware doesn't do at the moment is to implement a HW based power switch function. The USBASP Einschalter does just that and it is relatively easy to implement. So this is definitely on my to-do list. The huge attraction is that you can then switch on the PC via remote control.
The other point is that I am fairly certain that the whole thing could be built based on only the ATMega8 and without the second controller. Some compromise concerning the selection of supported IR codes would probably be needed in order to fit everything into the 8K of flash memory. In some aspects, the software would become simpler, because e.g. the serial communication could be eliminated. Ideally, the software would then run on the "Einschalter" hardware. But with everything working well and with the ATTiny85 being relatively cheap, this is not top priority for me.
So, have fun with the projects as it is, improve on it and let me know your thoughts on it. The code, hex files and schematic are available for download here.
UPDATE: There is an additional post with an add-on to control your PC power button as well.


Shucks. Would you happen to still have the downloads to this project? I really like your implementation and it would fit my purposes exactly. Thank you so much for your attention and hard work on all your projects.
ReplyDeleteSure. Top / Right of this page is a link to the download section.
DeleteAlso, last sentence of the post (before "UPDATE") has the link.
Let me know if the link doesn't work!
Thank you for looking into this! I am getting the dreaded 404 error when I click on any of the download links in the locations you mentioned for this project. The error page displays this for me...
Delete404. That’s an error.
The requested URL /host/0B_acb-AcSkXYNnFZUWNXUDl1ejQ/RemoteKeys.zip was not found on this server. That’s all we know.
Thank you again!
Hm,Kalvin,could you try again? It seems that the link has somehow changed.
DeleteThat worked! Thank you so much! Can't wait to build this circuit when I return from holiday vacation!
Delete